The Grand Gallery Pictographs – Canyonlands NP, Utah

In the late 1960’s, early 1970’s, I purchased a Sierra Club Ballantine book authored by the brothers, Renny and Terry Russell, titled On the Loose.  It was comprised of their accounts and their photographs from explorations as young men in the wildlands of Utah.  One picture they took and included in the book was of the “Grand Gallery” of ancient Native American pictographs in a small, separate and remote piece of Canyonlands National Park in Utah.  The book captured my imagination and I had every intention of following in their footsteps.  I made several road trips into the southwest before 2004 when I finally set out to find the Grand Gallery.

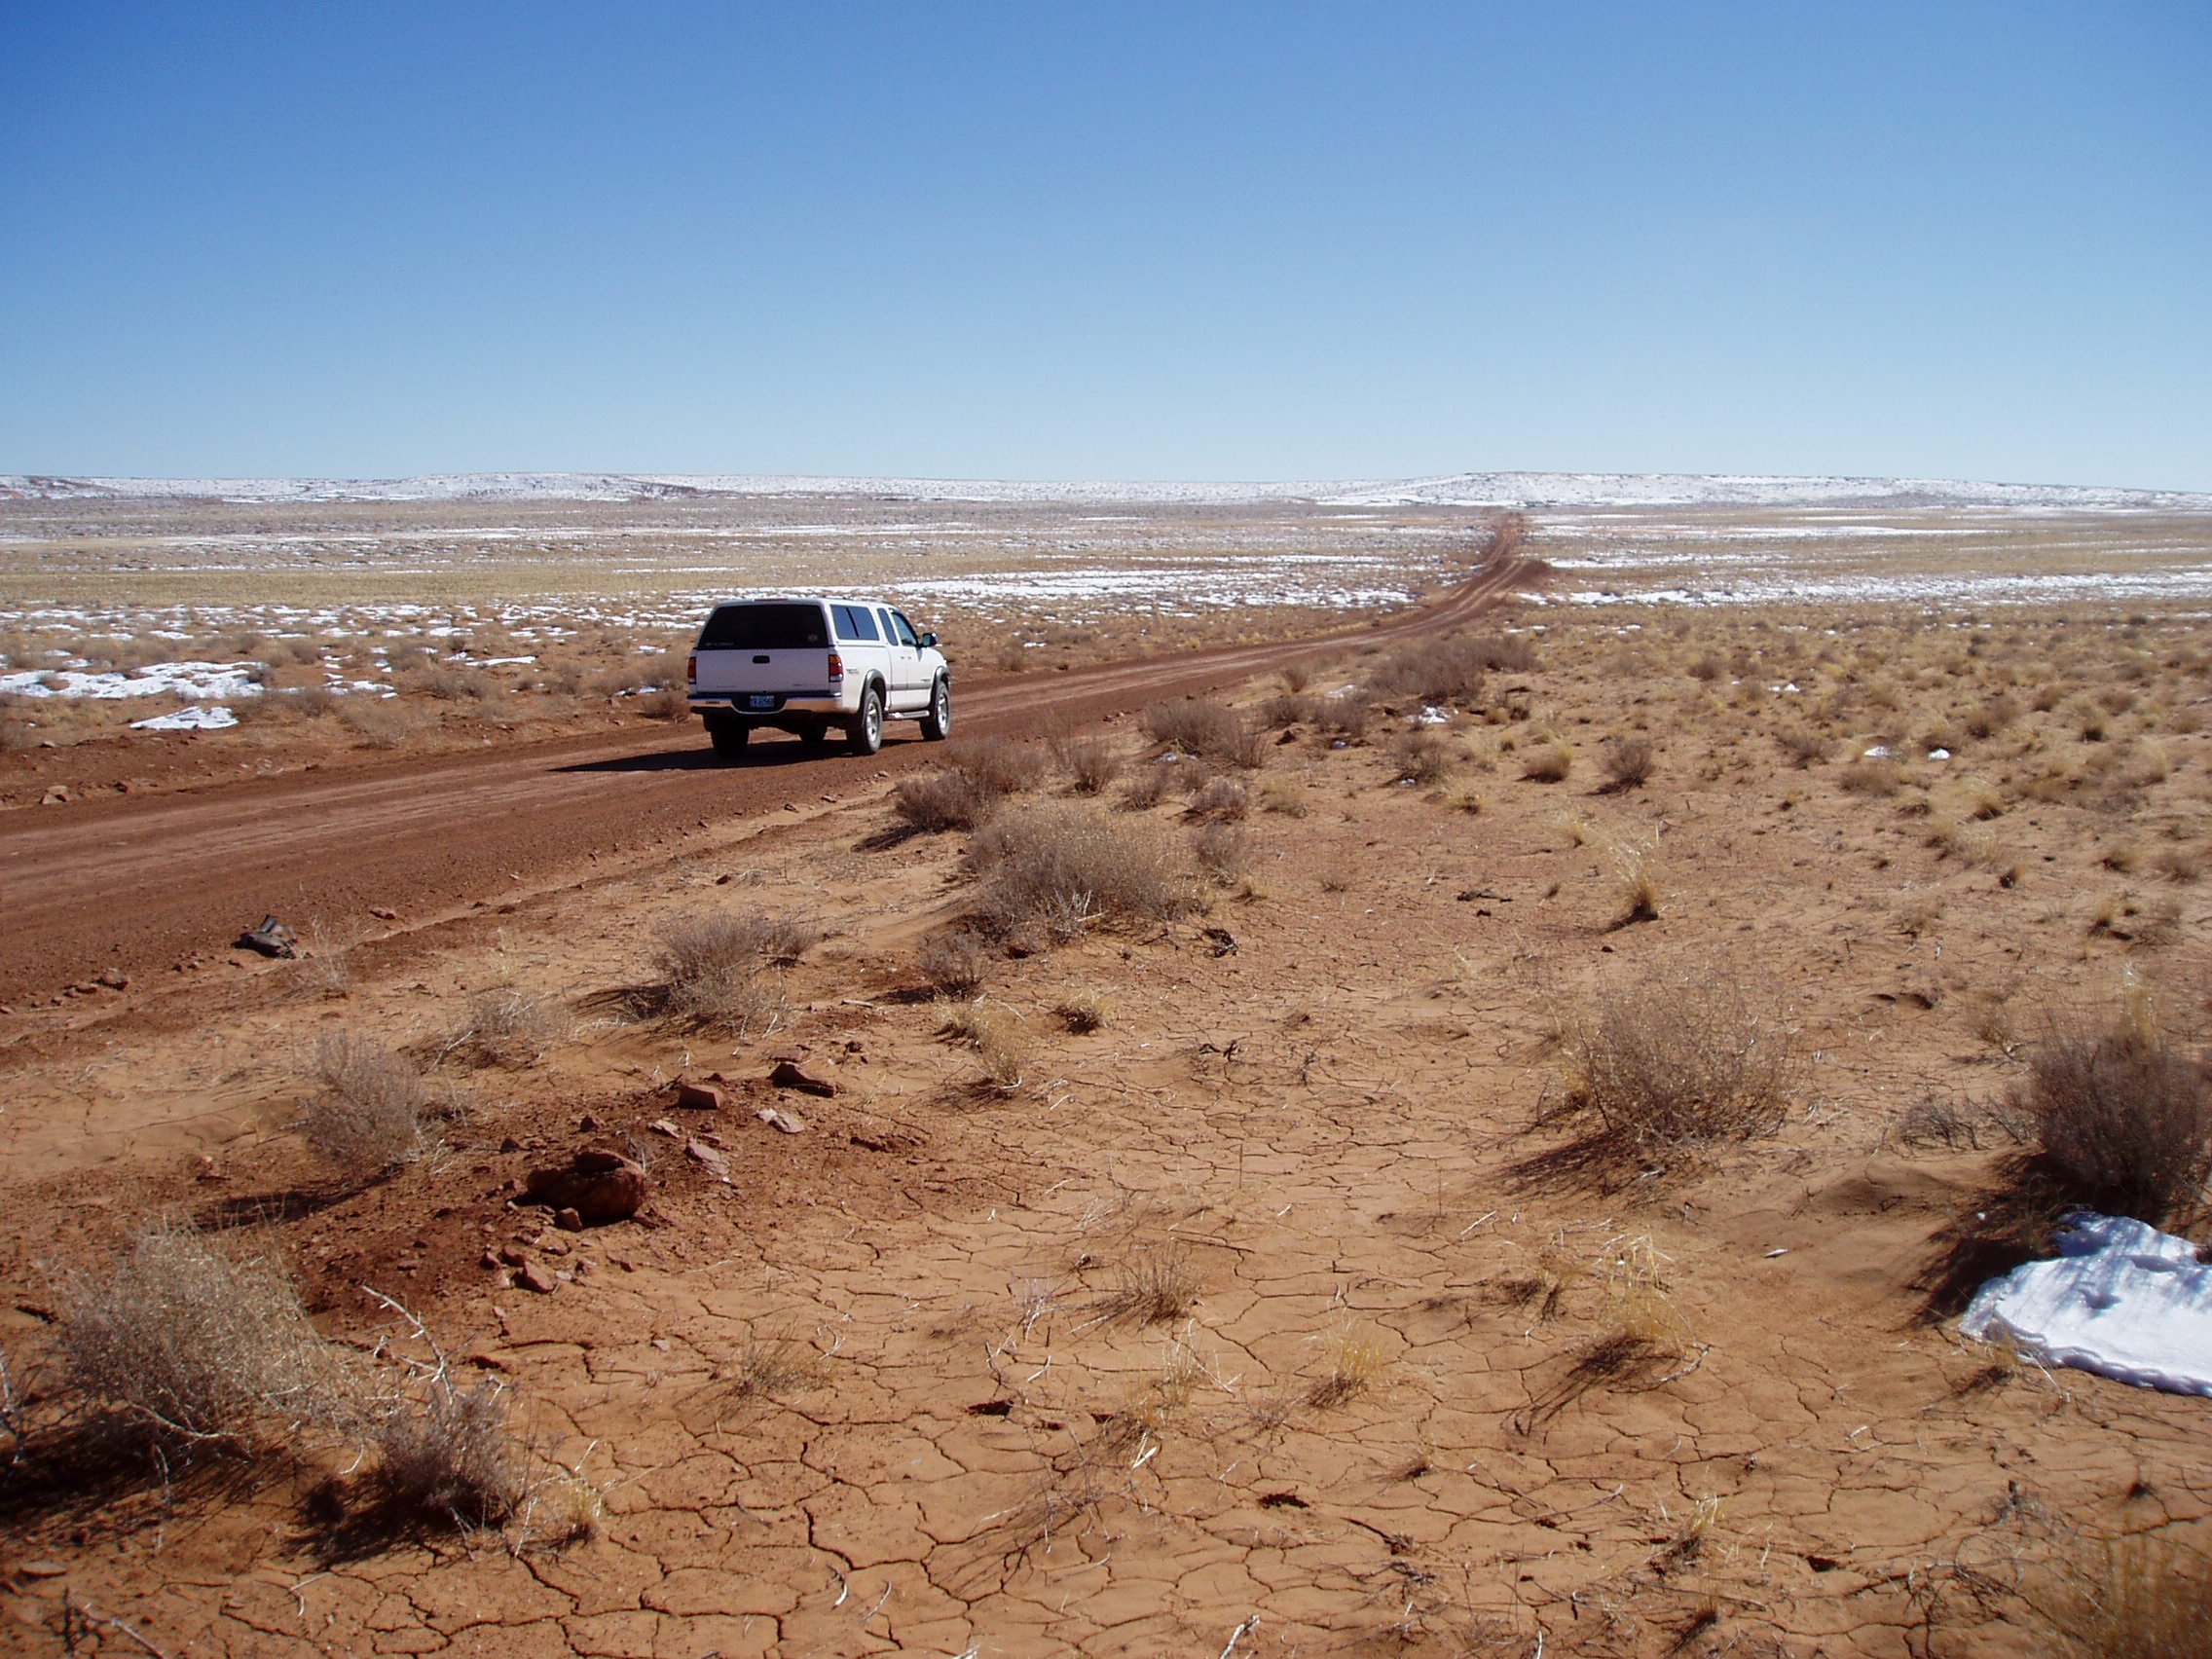
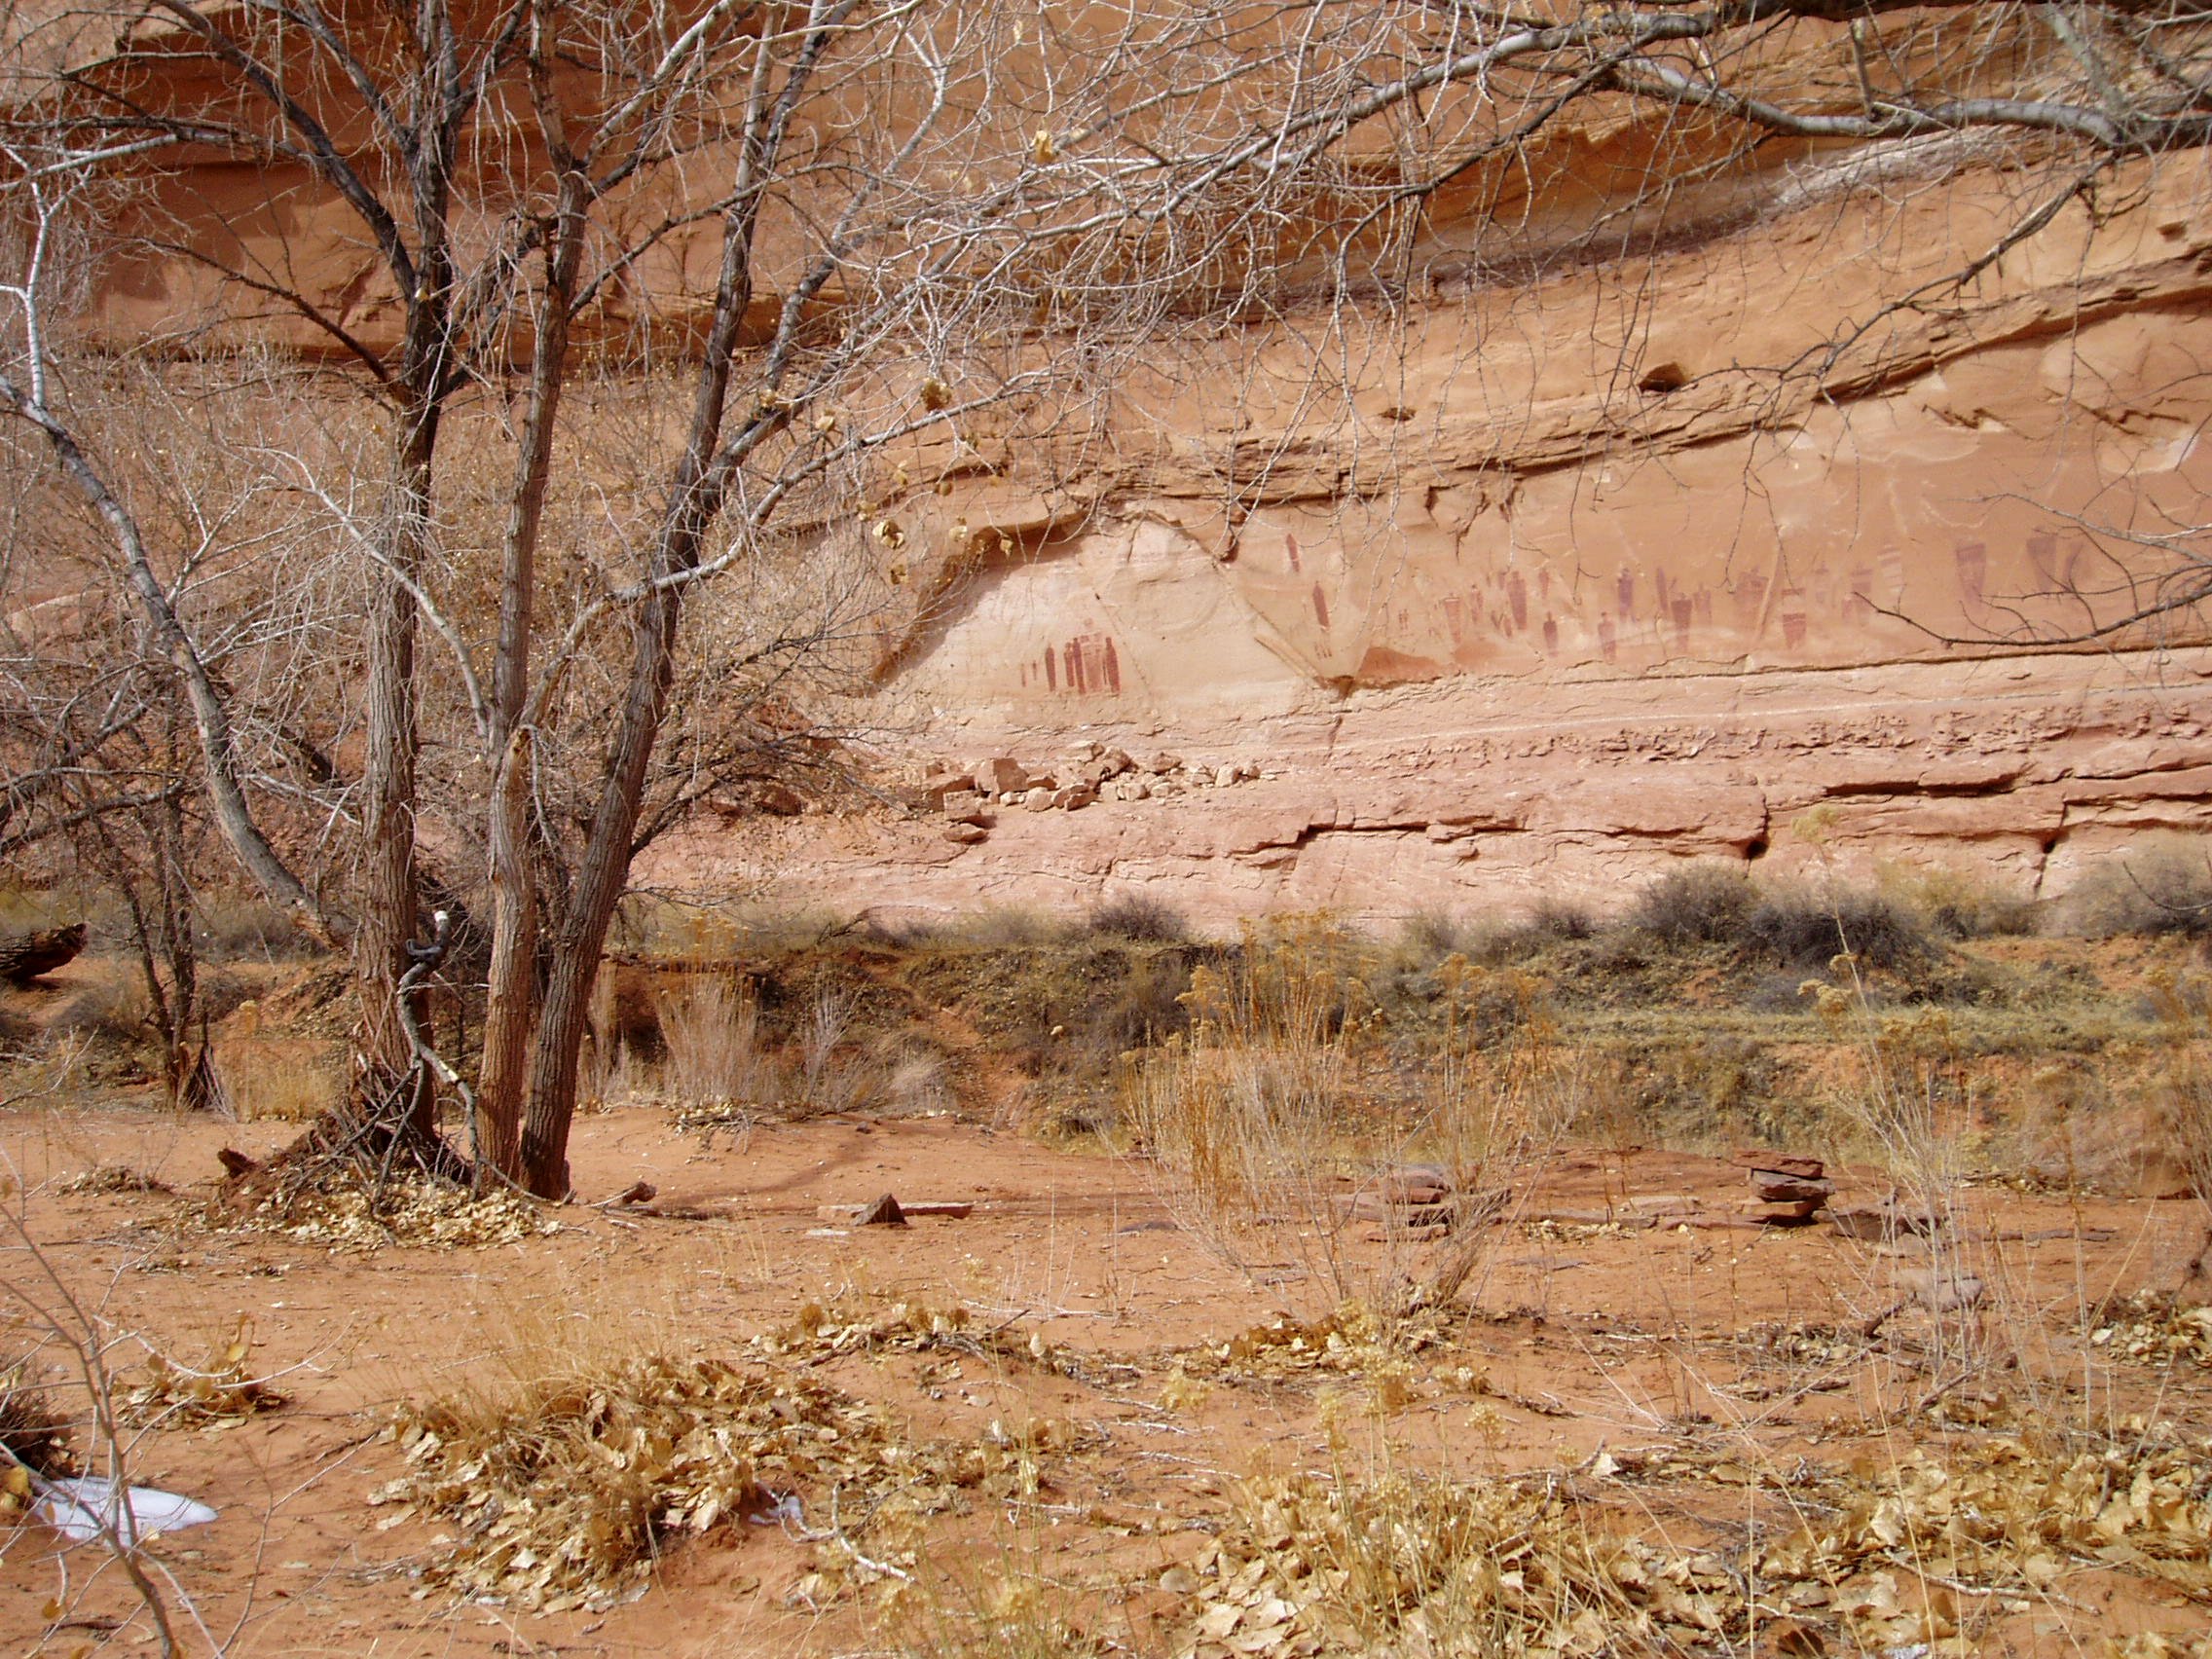
Departing from a paved highway in central Utah, the dirt and gravel road to the trailhead for the gallery is about 25 miles long.  I made the trip in February.  It was so cold the night before I set out on the day-long hike that my gallon of milk turned into an icy slush overnight.  The trail to the gallery descends from the tableland into the canyon on a very rough “road” dynamited in the 1950’s by uranium prospectors down a sandstone cliff to the canyon below.  The hike takes half a day to the gallery and half a day back.  I had it all to myself.

The pictographs cannot be precisely dated but are estimated to be thousands of years old, made by the Archaic peoples who preceded the Anasazi and more modern Pueblo people.  Here are some photos taken on the way out to the trailhead and on the day of my hike.  [Click on any image to enlarge, All photos copyright symbol Max Vollmer]

The long road out to the trailhead.
Parking at the trailhead.
Dinner of beef stew with fresh, steamed broccoli.
Hiking through the canyon.
The Grand Gallery on the cliff face from 100 yards away.
Some of the pictographs, the largest of which is approx. 8 feet tall.
Otherworldly, probably shamanic figures.
Deer, antelope, and buffalo presumably, with a hunter holding his bow and arrow to the right..
Closeup of the deer pictograph.

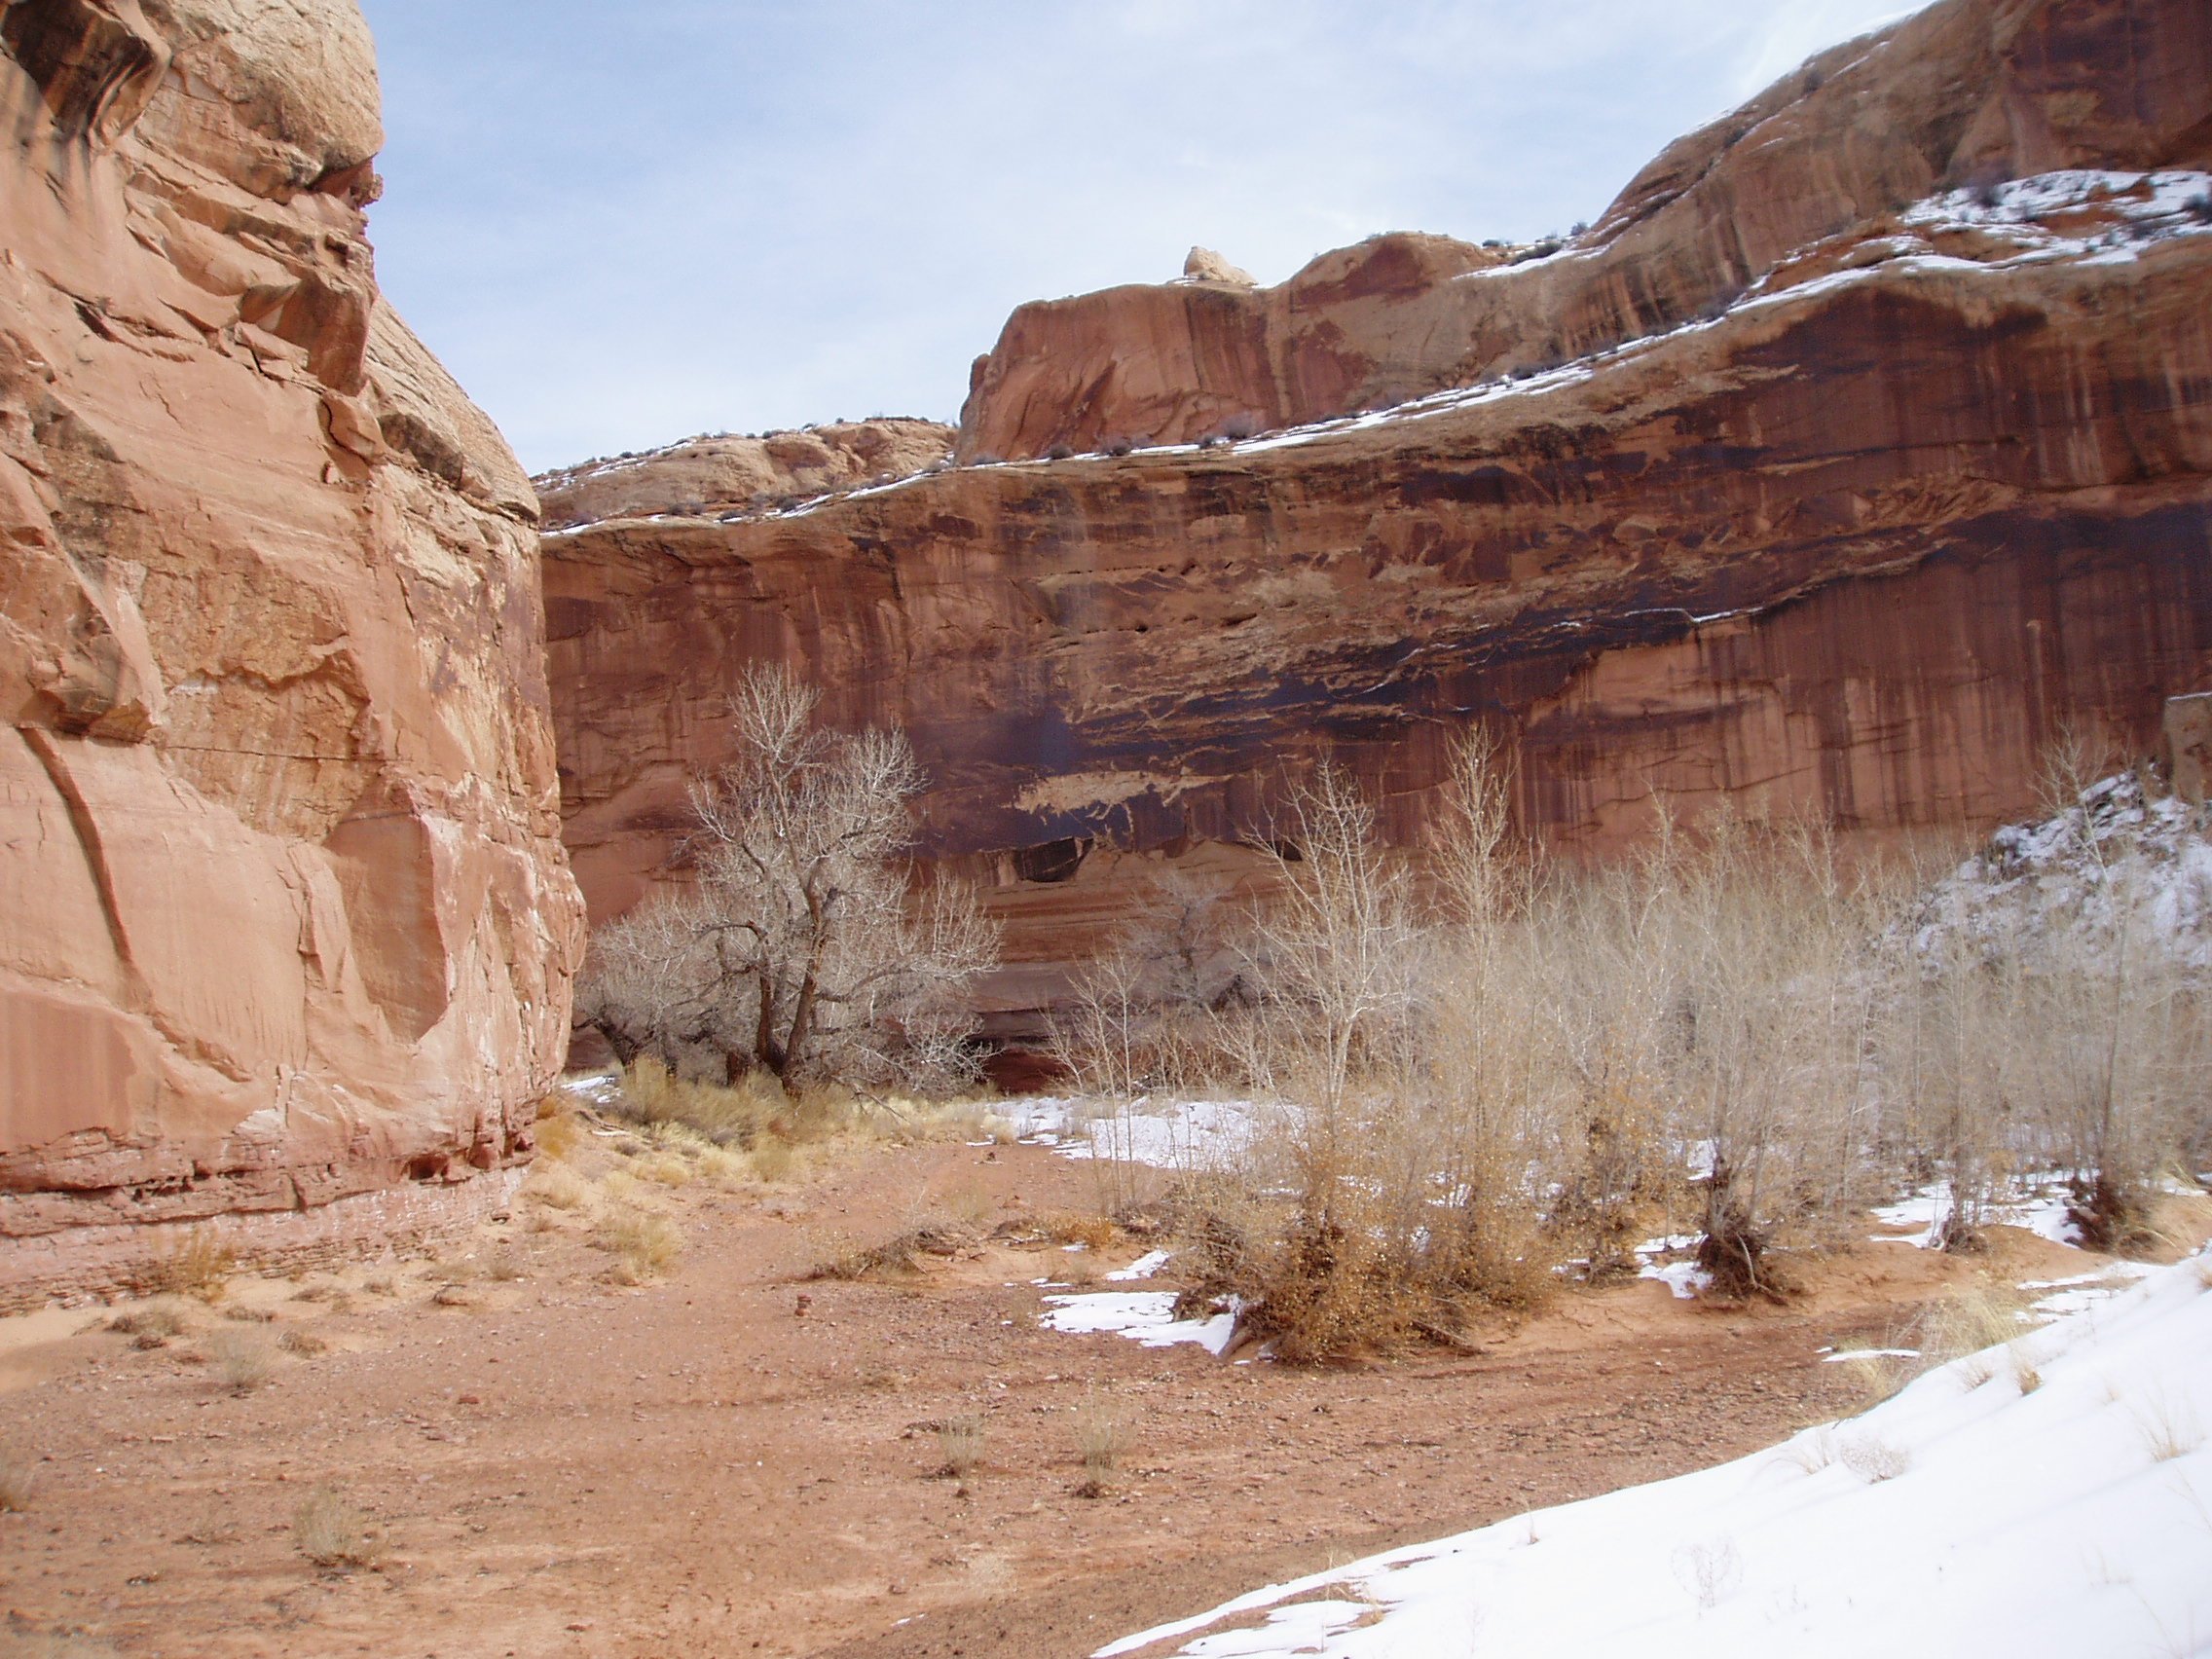
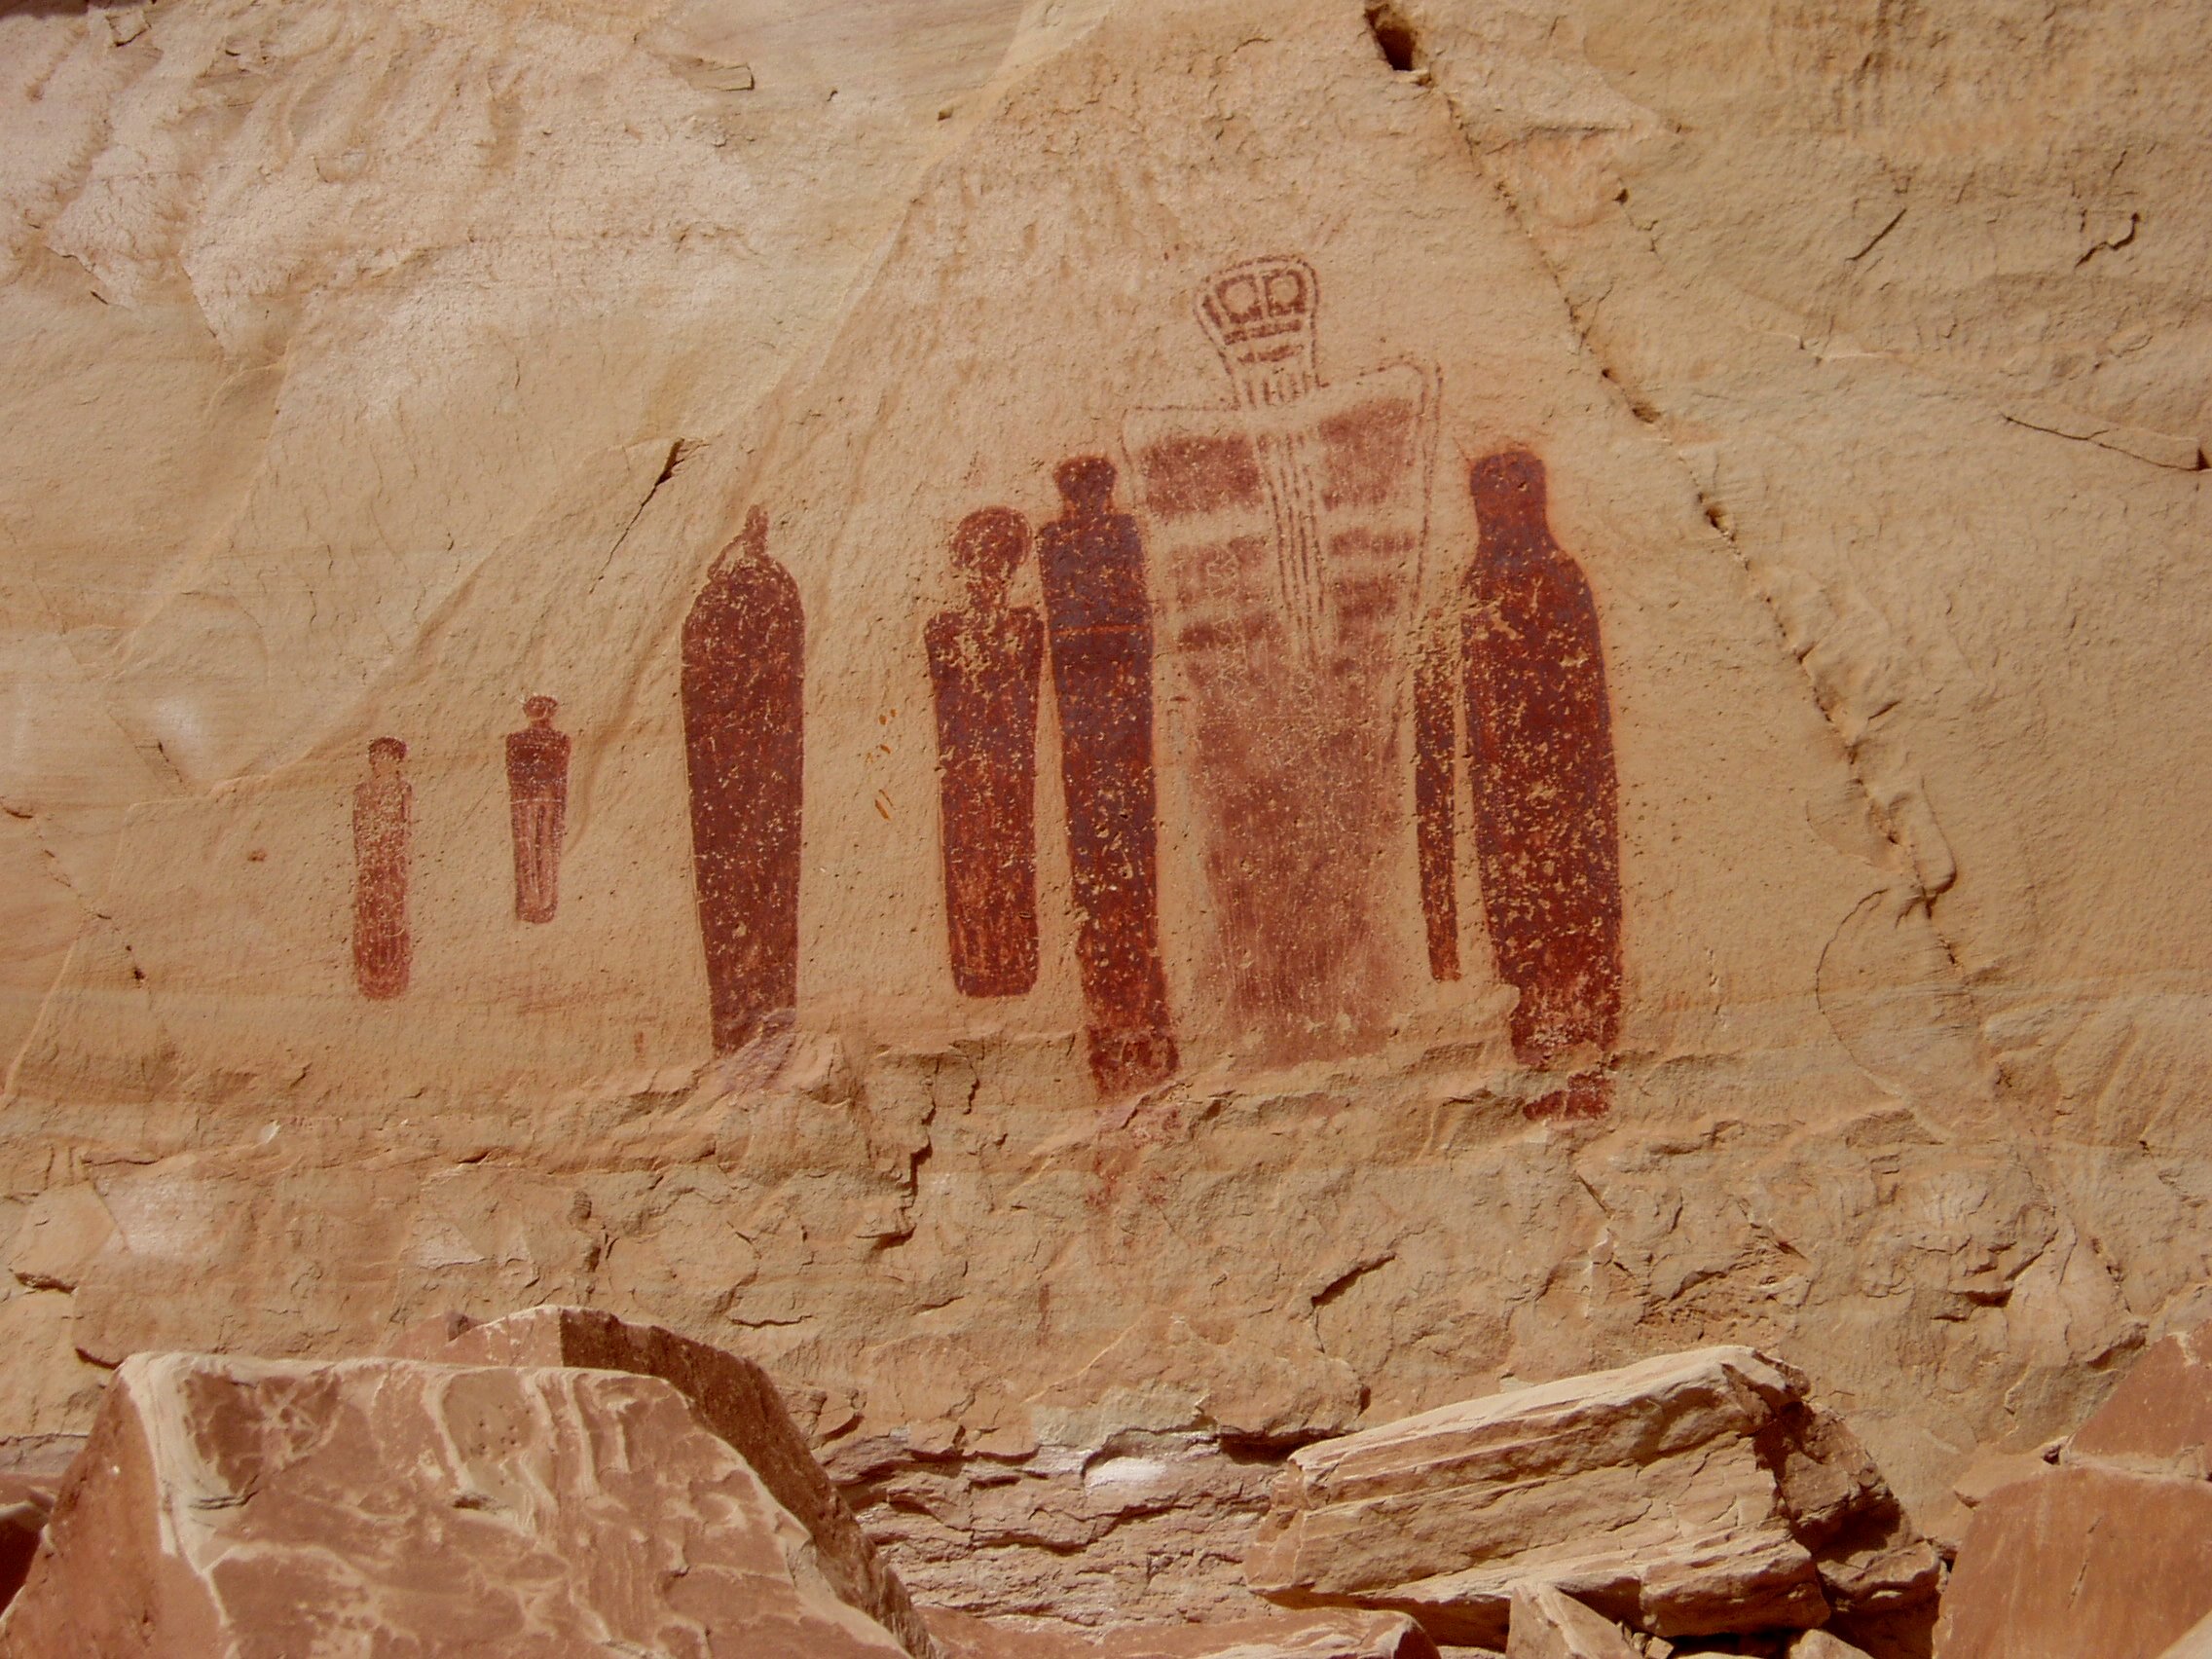
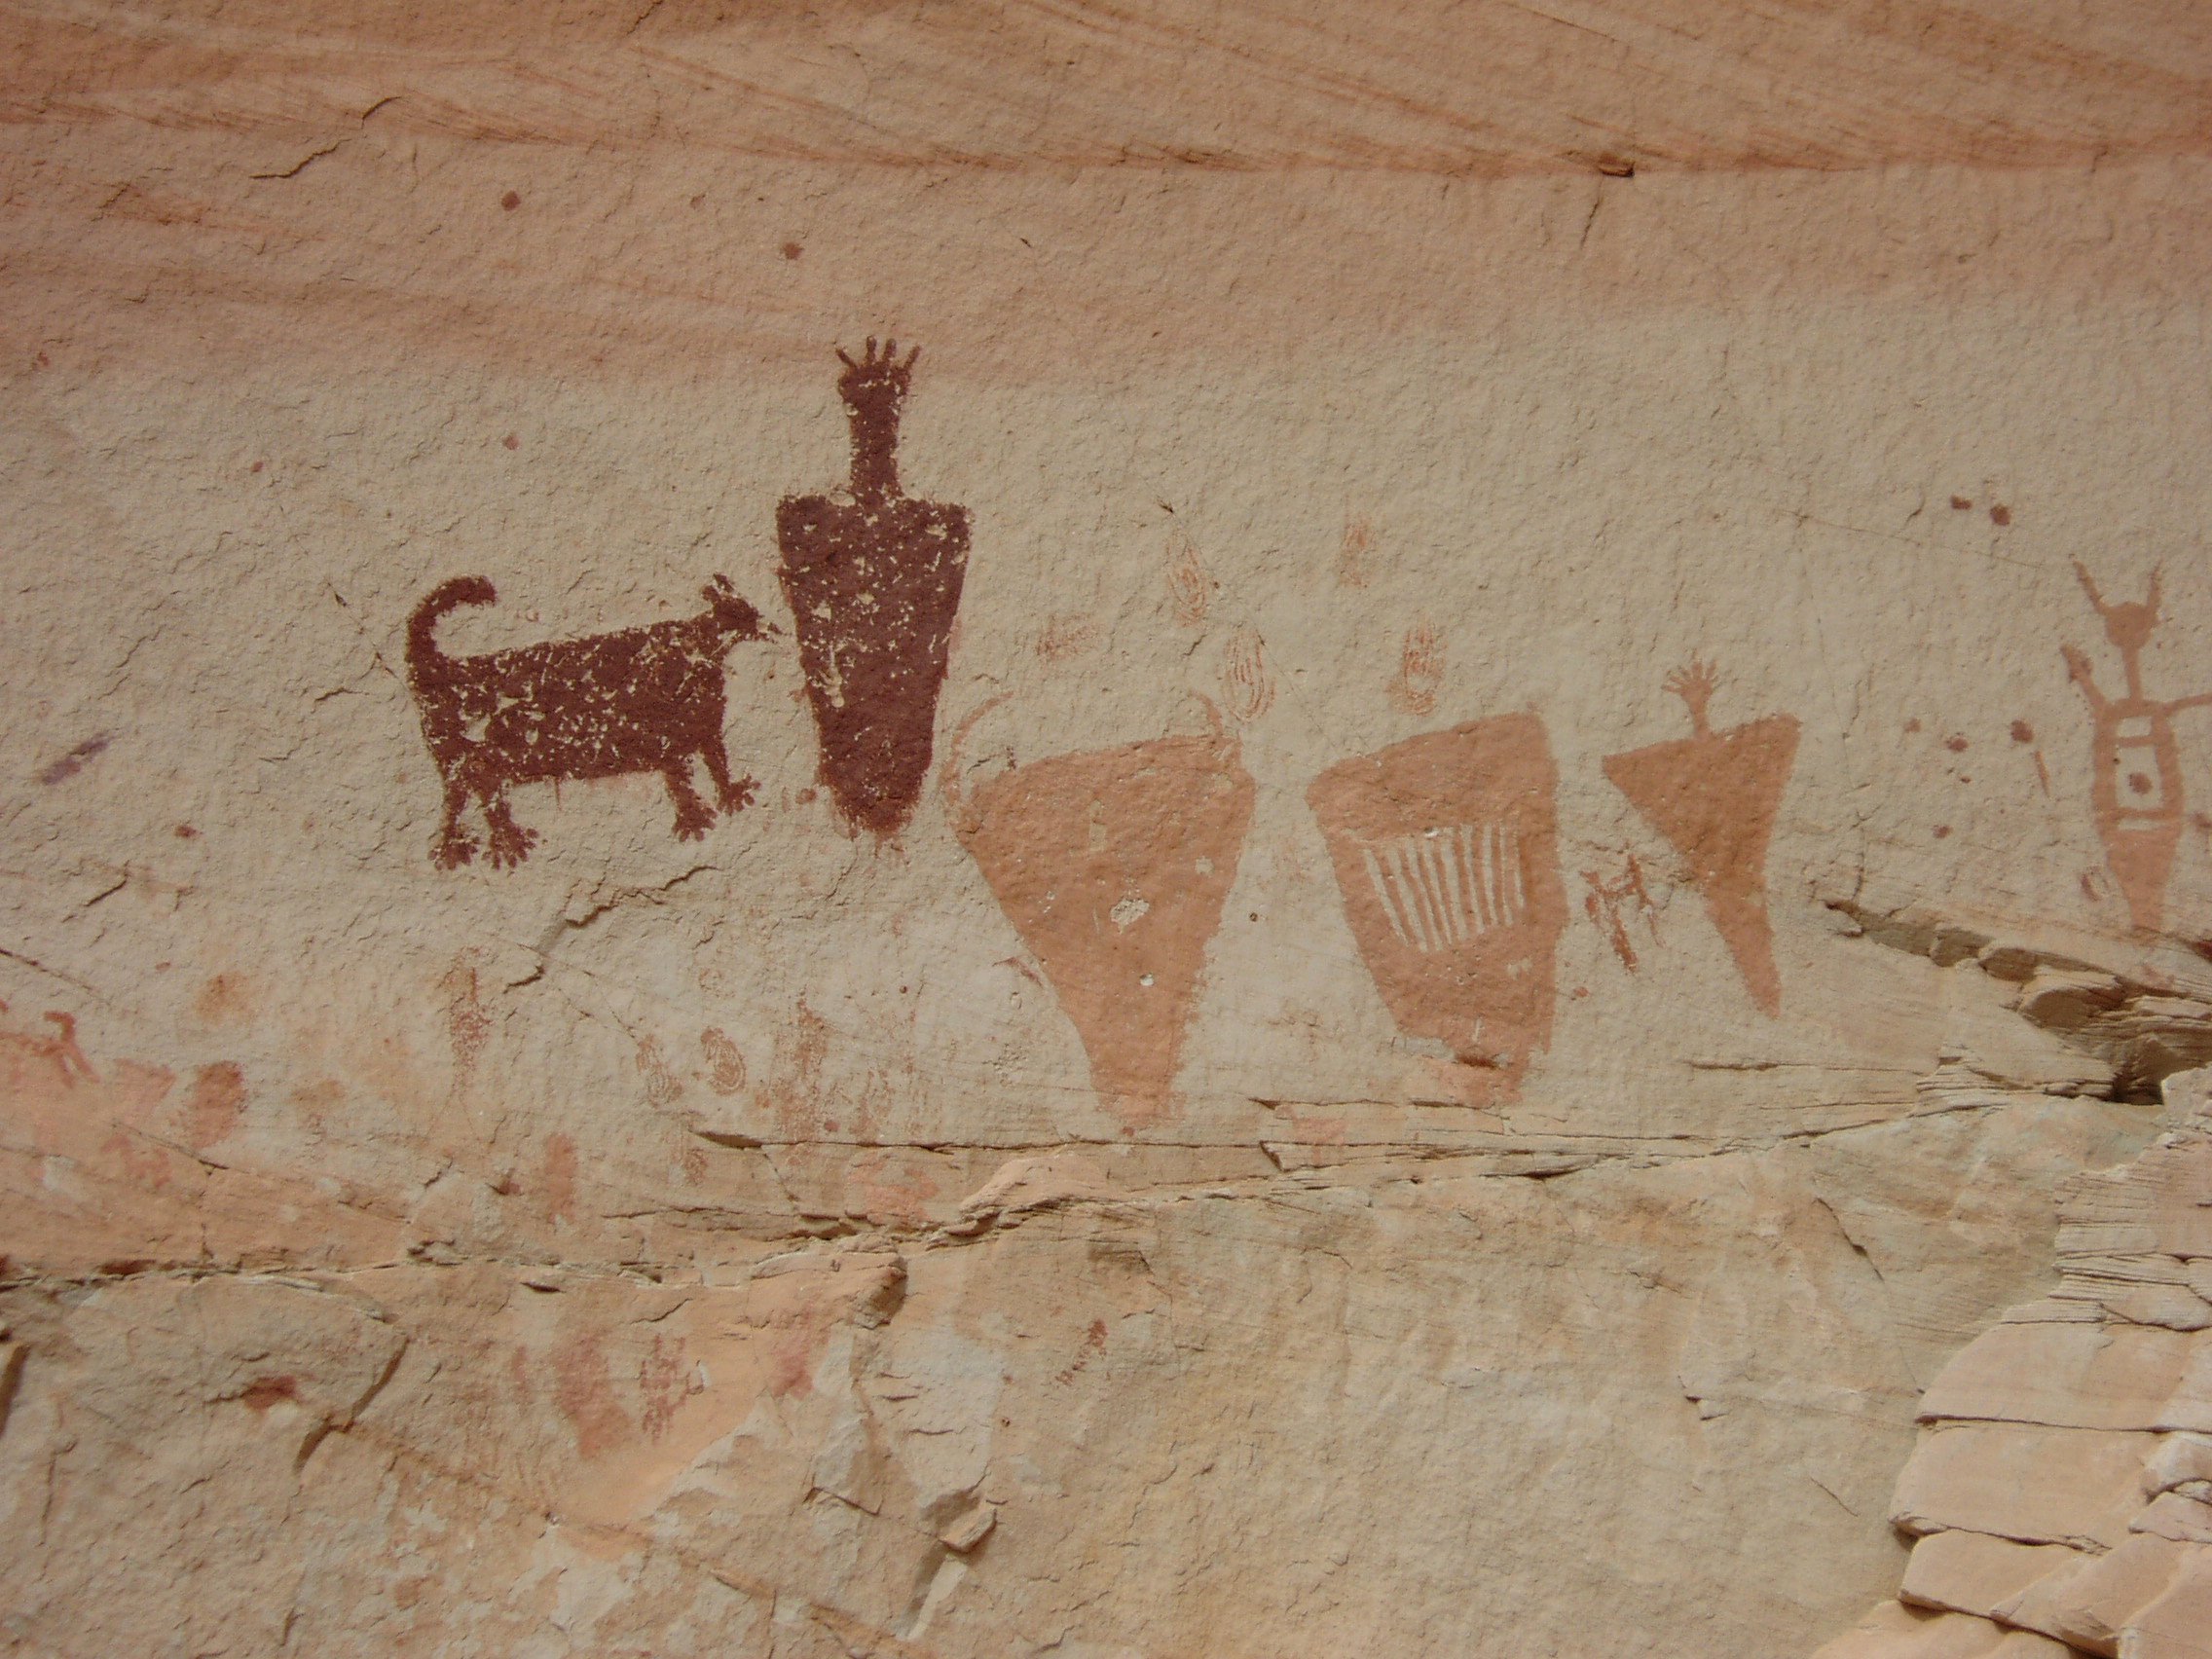
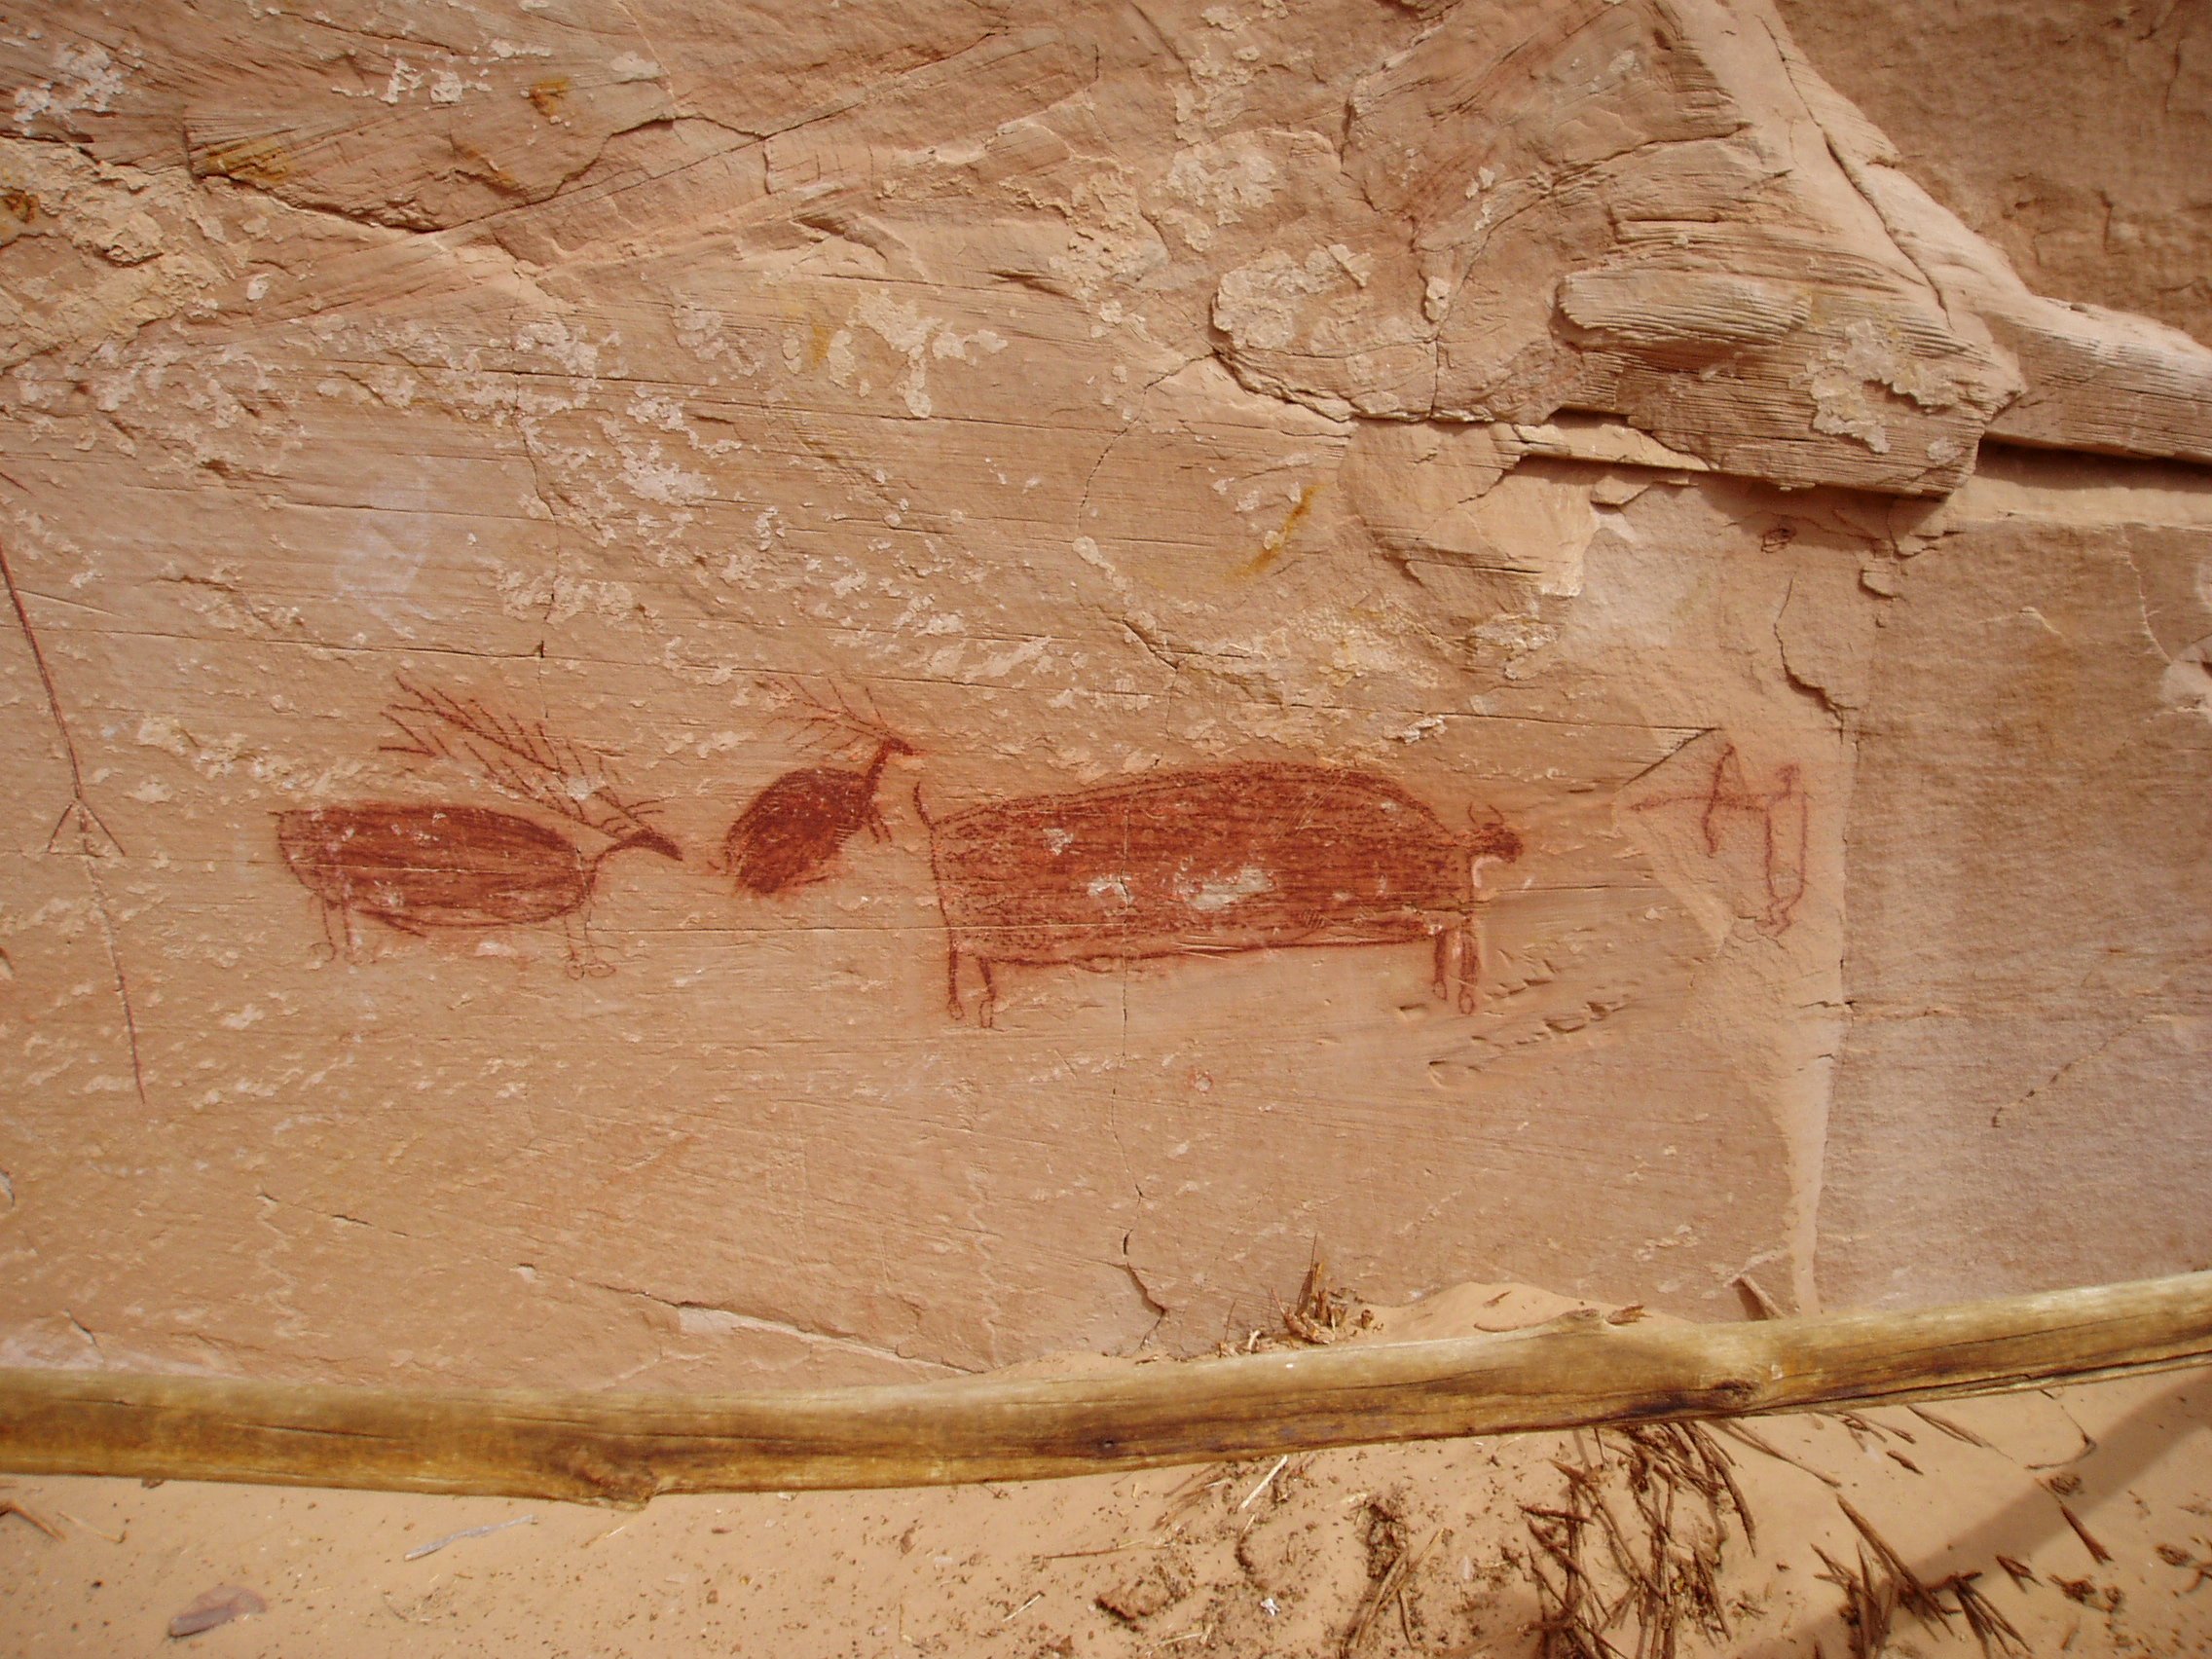
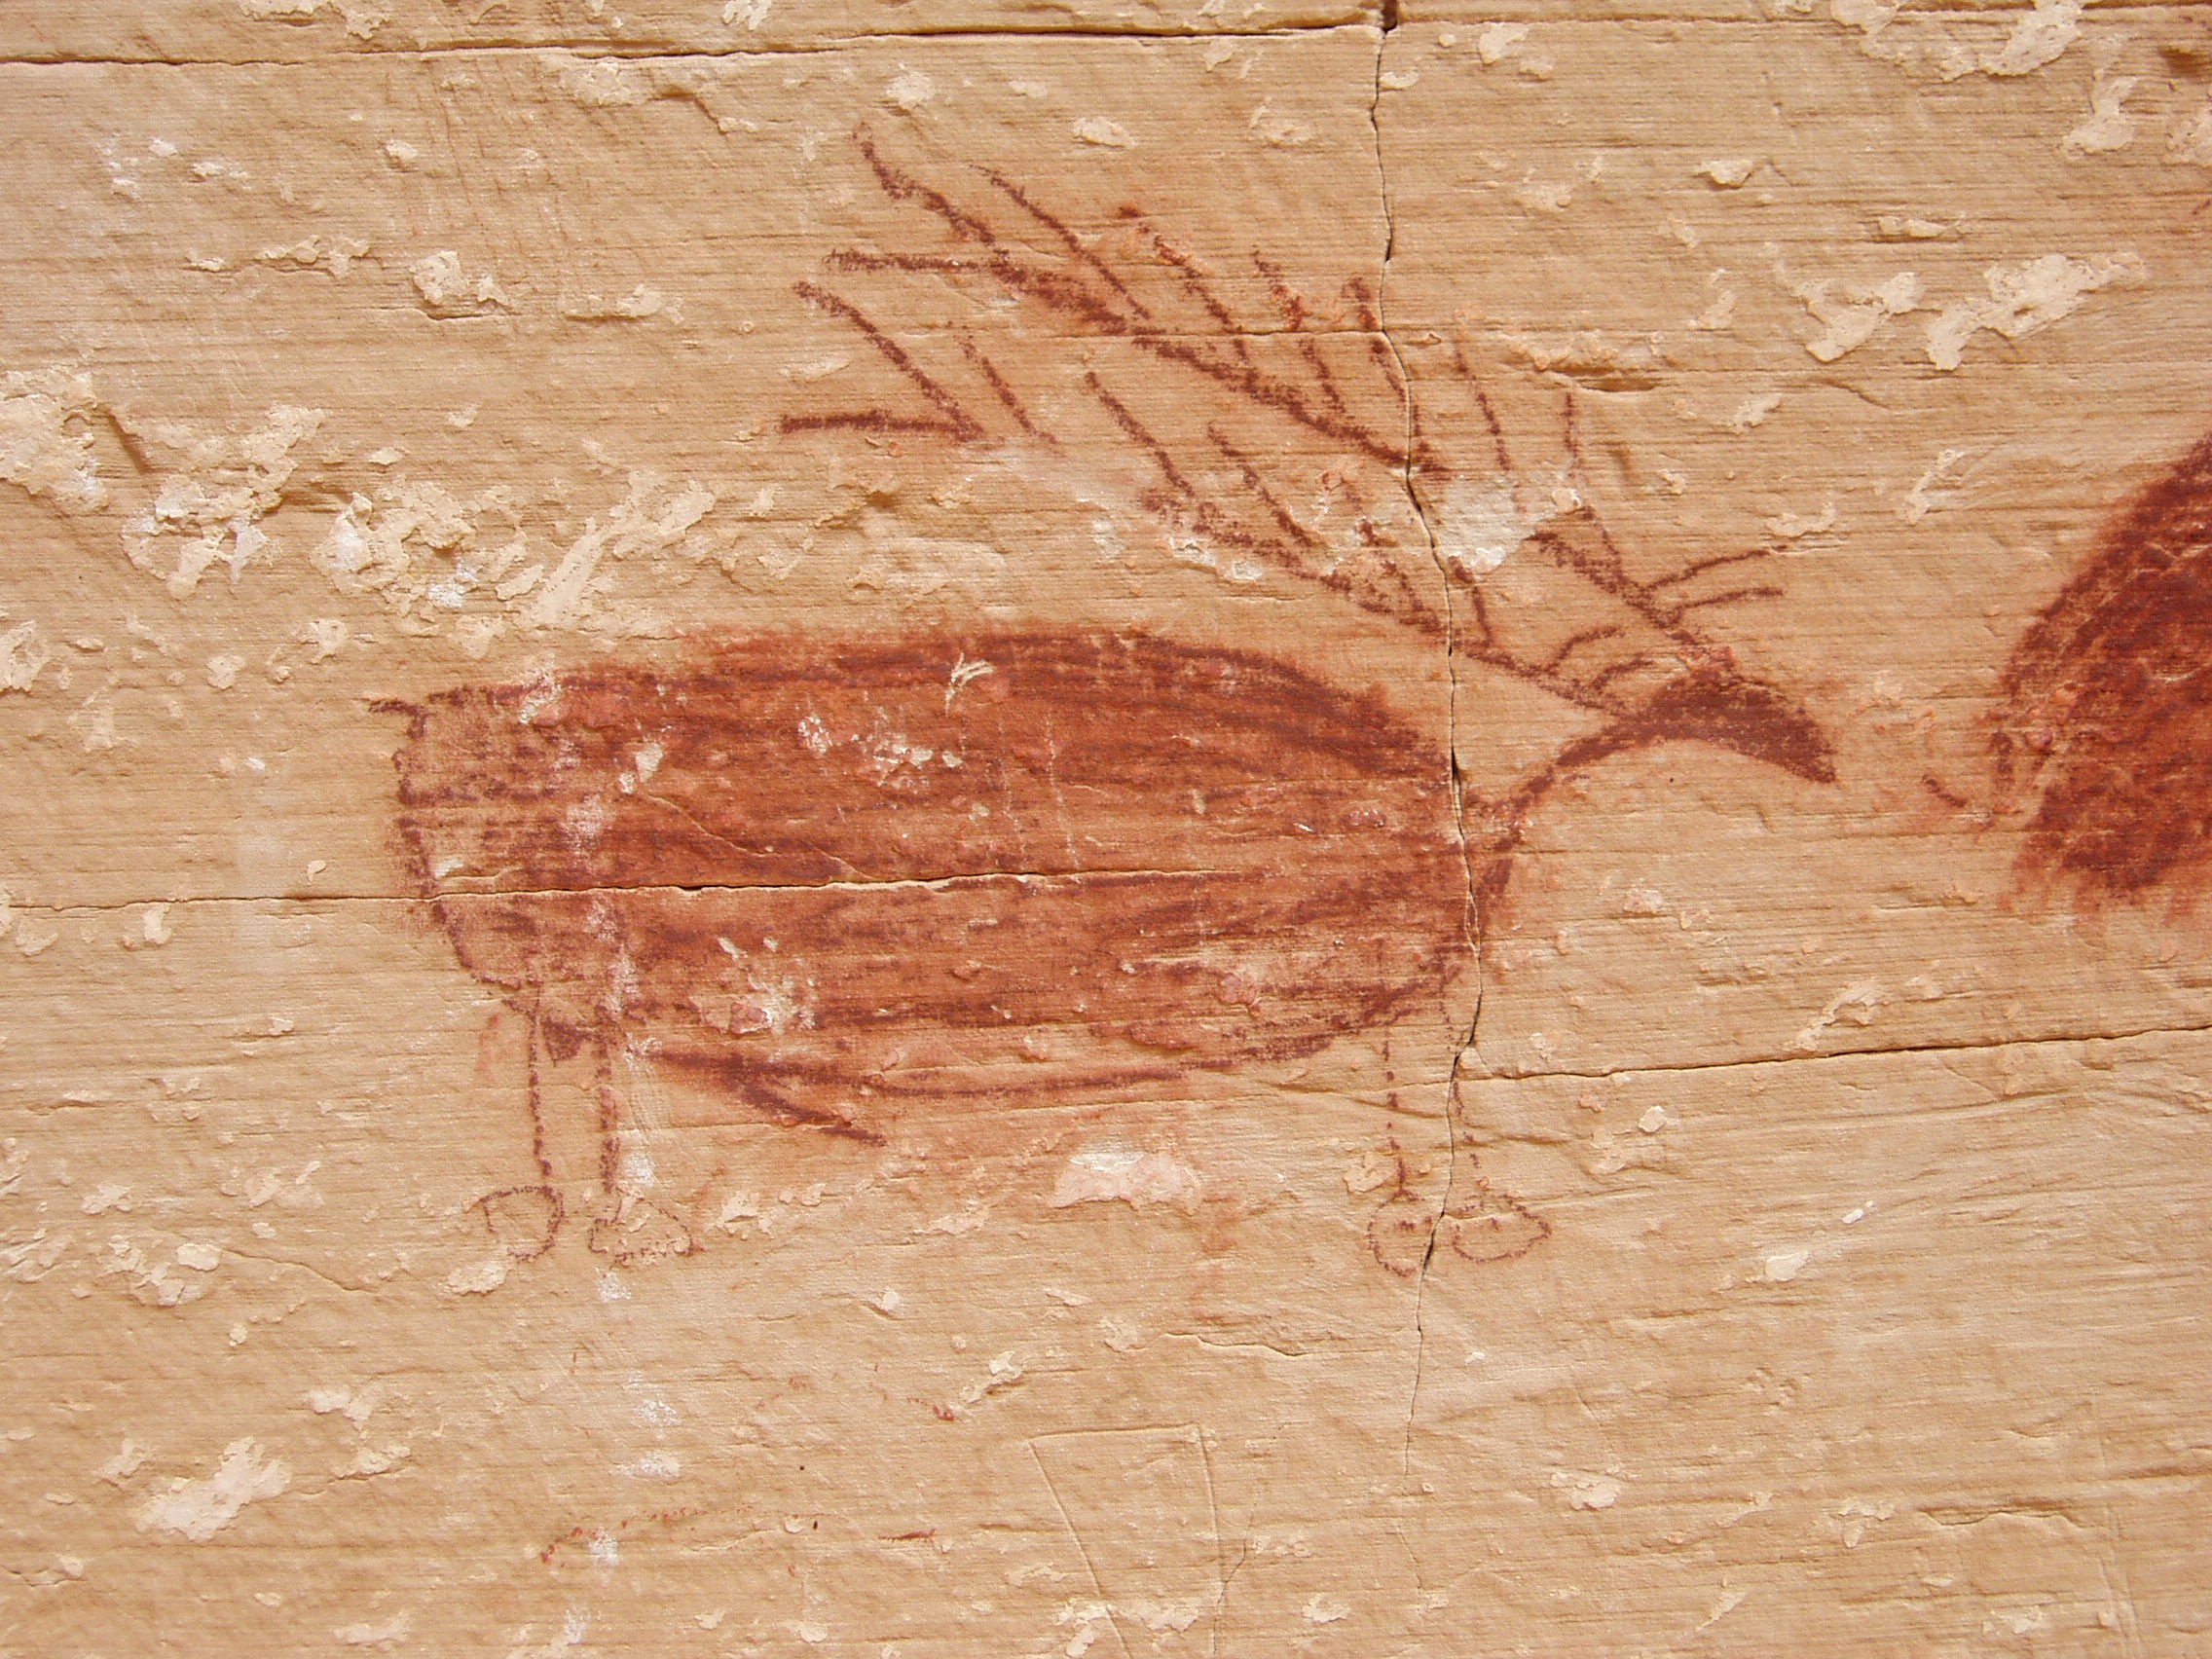
The largest and strangest anthropomorphic figures are believed to be the work of shamans on their vision quests.  The animal figures are thought to represent the game hunted by a later group of people.  Fortunately, all the pictographs are now too high up on the wall to reach which gives them some protection from vandals.  Erosion over the centuries has lowered the canyon floor.


Malheur County, Owyhee Canyonlands, Oregon – January 2021

I made a mid-Winter trip down to the SE corner of Oregon, in part to find some open space amid the pandemic, but also for my first glimpse of the Owyhee Canyonlands.  This remote area is very sparsely populated by cattle ranchers and some sheep herders.  To give you and idea, one sign I passed read, “Next gas 120 miles.”  I hit a spate of dry weather which was fortunate because the desert soil turns to a slippery and sticky gumbo when wet.  During the day I needed 4WD on the Leslie Gulch-Succor Creek Byway which is mud in winter.   Here are a few photos.   [Click on any image to enlarge, All photos copyright symbol Max Vollmer]

This was just before sunset at my first campsite NW of Burns Junction.  Overnight low was 28 degrees F, enough to freeze the mud which made it easier to break camp in the morning.

This was my setup at Succor Creek State Park alongside the Owyhee River.  Dinner that evening was Beef Stroganoff with egg noodles, sliced red pear with some cheese, and hot coffee.

Darkness fell around 5:30 p.m. and the pre-dawn light didn’t amount to much until 5:30 a.m.  That makes for a long night in the sack.  When I packed up and departed on my last morning along the Owyhee, it was 22 degrees F.  I had hot coffee and cleared out while the mud was frozen and shallow puddles were iced over, but not before picking a bunch of sage along the river bank to perfume the truck cab.

Winter colors in the canyonlands are not much to brag about.

Priest’s Chair – Palace of the Governors, Santa Fe, New Mexico

I found this picture online of an 18th century chair in the collection of the New Mexico Museum of Art in Santa Fe, New Mexico, known as the Priest’s Chair.  See below.

There are a few, early, carved armchairs like this one from northern New Mexico that are referred to as Priest’s Chairs without any documented connections to churches.  However, chairs of any kind were few and far between on the northern New Mexico frontier in the 1700’s and armchairs like this one would have been found only in the homes of prosperous Spanish families and in a few Catholic churches with larger congregations.  The wood used in the original was the best timber available at the time, Ponderosa pine from the Sangre de Cristo mountains.   I decided to make a copy of this chair, with added details, to accompany my carved New Mexico bench (October 2015 Archive) and my carved Harinero chest (January 2018 Archive).  This was the last project I completed before dismantling my shop in January 2020.

Without plans or the actual chair to go by, I based my chair dimensions on the research I did for the New Mexico bench and the old photograph.  I prepared scaled drawings and then followed my usual practice of cutting and shaping all the individual pieces for the chair, including in this case, the “through” mortise and tenon joinery used on the original (“through” referring to the fact that mortises pass all the way through the wood so that the tenon ends are exposed).  See below.  [Click on any image to enlarge, All photos copyright symbol Max Vollmer]

I then tried to estimate the original dimensions of the back splats and those in front, below the seat; drew them on paper, glued the paper down to boards, and rough cut out the shapes on the bandsaw leaving enough wood top and bottom for tenons to go into the chair rails front and back.

The front and back sub-assemblies for the chair, with carved details, looked like this.

I assembled the main chair components, leaving the armrests off at first so that I would be able to accurately locate them on the back legs of the chair.

Locating the armrests was a little tricky.  I wanted them level with the ground and at a height that would be comfortable for someone seated in the chair.  I clamped the unfinished armrests to the front and back legs, marked their position, and then marked out the mortises in the back legs.

The location of mortises and tenons were marked on the armrests and the chair legs, cut as marked, and then all that remained was to attach them.

I sealed the pine with Minwax Natural and then made a blend of Minwax tinted sealers to darken the wood.  Finally, I attached a temporary plywood seat that will be upholstered when  I get the chance.


A New Home for my Timberline desk and chair

Not long after moving to Eugene, Oregon in 1987, I traveled to Timberline Lodge on the slopes of Mt. Hood to take photographs and measurements of what are known as the Mezzanine Desk and Chair, part of the of the original 1930’s Depression era collection of furniture made by WPA (Works Progress Administration) artisans for the lodge.  I did that so I could make an exact reproduction of the two pieces.  Below you see a picture of the cover of a book on Timberline Lodge published by Friends of Timberline in 1978 and a photograph from the book of the original desk and chair in one of the alcoves on the lodge’s mezzanine level.

My reproduction differed from the originals in two repects:  one, I used clear vertical grain (CVG) Douglas fir while the originals are made of Douglas fir with knots; and two, I made rubbings of the carved five-petal flower on either side of the upper portion of the desk in order to replicate the carvings on my reproduction.

With no plans to guide me on the actual construction of the heavy-timbered  desk and chair, I settled on what I thought would be the most durable way to secure the leg and stretcher sets for both, and that is through the use of sliding dovetails.  Although I do not believe this is the technique used on the originals, it made the greatest sense to me because of the fact that both leg sets are splayed outward creating compound angles where the legs connect to the skirts and the stretchers, as you can see in the photograph above.  The desk legs were approximately 4″ x 4″ square and the chair legs were approximately 3.5″ x 3.5″ square.   Constructing the legs sets so that the splay angles matched those I had measured in the originals was a  challenge, involving the use of the traditional sliding T-bevel.  Below you can see the leg set for the chair, and the skirt sets for both the desk and chair, prepared for assembly with the dovetail slots and keys.

In the next two photos you can see a detail of how the skirt pieces are joined to a leg, and then the fully assembled leg set for the desk.

The rounded profiles on all four legs of the desk and chair were created prior to assembly by rough cutting the profile one leg at a time on the bandsaw and then finishing by hand with wood rasps, files, and what are called wood “floats,” and finally sandpaper.

The pieces for the desk top, the seat and back for the chair, and the upper section of the desk were all worked with handplanes to create the smoothest surfaces, smoother by far than what is possible with  sandpaper.   Below you can see my use of a jack plane to refine the edge of the desk top.

The next photo set depicts the desk and chair assembled, with a detail of the chair back support, but prior to the application of any finish.

With a Minwax Natural sealer and a Watco Danish Oil natural finish, the set looked like this when new in 1987.

I used the desk and chair from 1987 until 2020 when I sold the two pieces and the 1978 Friends of Timberline book to a couple in Portland, OR.  The wife in particular has a love of Timberline Lodge and has collected Timberline memorabilia, including commemorative Timberline Lodge blankets woven by the Pendleton woolen mills in Pendleton, OR, to display in one corner of her home.  The couple have two children who use the desk now for homework.  I could not have asked for a better home for my work.  Here are two pictures she sent me of the desk and chair in their new home.